Home Products FAQ Dillon Manuals Contact
Frequently Asked Questions
As the Shellplate bolt is tightened there is additional friction
between the shellplate and the press. The shellplate bearing overcomes
this friction. This stabilizes the shellplate and reduces run out. This
will dampen the motion of the shellplate, reducing powder spills as
it moves into position. You will also experience a better feel for each
operation. Decapping, priming, and seating each have their unique feel.
You'll know when a primer isn't right. With the reduced run out, case
overall length will be more consistent. The result is a better operating
press, consistent ammo, and increased run rates.
Lubricate the bearing with a little grease, don't pack it like a wheel
bearing. If the grease is collecting gunpowder on your press that's
too much. We use Mobil 1 or Slide-Glide.
We used to sell the oil-lite thrust washer kit. Feedback from our customers
told us it wasn't a good value. The needle bearing has a far greater
range of bearing preload making it much easier to tune precisely. We
still have a pile of these oil-lite washers. If you bought one from
us, we'll replace it with our needle bearing - no charge. If you want to try one
send us a message before you order, we'll add it to your order for 25
cents (fits 650 or 750). Then you can decide.
How the Low Mass Detent Ball & Reduced Power Spring works:
Our Low Mass Detent Ball for the Dillon XL 650, XL750, SL 900, Super 1050, and 1100 is tough as nails. This ball is super hard, smooth, and lightweight. It's approximately 7 times lighter than the factory steel ball and every bit as tough. The low mass detent ball has less momentum when it locks up with the shellplate. The material also absorbs vibrations much better than the steel ball. This detent ball is highly abrasion resistant and will not be cut or scared by the shellplate. These are industrial grade and used when strength and abrasion resistance is required.
Both the low mass detent ball and reduced power spring are custom made to our specifications for this purpose. We didn't settle for off the shelf products that are close enough.
How the Camming Pin Bearing works:
The camming pin bearing replaces the camming pin on your XL650, XL750, or SL900. This is a sealed bearing, as such, no maintenance is required. It smoothly rides the case insert slide cam. You won't need to lubricate the cam to prevent wear, resulting in a cleaner press. To install remove the locknut with a 9/16" wrench, unscrew the original pin and screw in our camming pin bearing. Each half revolution of the camming pin bearing is .020" of adjustment. Before you tighten the locknut ensure the bearing rides square on the case insert slide cam. Use a 1/8" allen wrench in the hex at the end of the pin, to hold it steady and aligned when tightening the locknut.
We match the dimensions of the OEM pin. Our pin fully supports the casefeed arm, reducing vibrations and unnecessary wear. Reduced vibrations helps to keep cases correct side up when using a casefeeder. This is an exclusive feature of our pin, not available from any other manufacturer. We make this camming pin here in our shop, using tool steel.
Additional Information
Our kits were featured in the Nov./Dec 2011 issue of Front Sight Magazine
Hit Factor Supply, LLC is a proud sponsor of the 2018 Great Lakes 3 Gun Championship at
Bend of the River Conservation Club. We have been a sponsor of this event every
year since the inaugural match.
Frequently Asked Questions
Here is a list of questions I get every now and then.
Q: How does the bearing kit work?
A: The bearing allows you to run the shellplate tighter than you
would normally. In other words, the bearing helps you overcome the
friction of a tighter shellplate bolt.
Q: The powder knobs fit loose, will you
send replacements?
A: The plastic powder knobs will form around the hex head on the
powder adjustment bar. This may take a few days. If you need a
better fit right away you could try warming the ring the nuts sets
in with a hair dryer to soften the plastic. Don't get carried away
with the heat, it shouldn't take much.
Q: Do I have to adjust my dies?
A: No, the bearing goes on top of the shellplate.
Q: Which lubricant should I use with the bearing?
A: Mobil One grease has more buffering effect compared to oils and
seems to stay put better. Just don't run it without a super light
coat of lubricant.
550 Series
Q: The sprocket is stuck on the
shellplate shaft of my 550, how does it come apart?
A: Find a socket that’s big enough (3/4” should do it) to allow the
shellplate bolt head to slide in. Place the sprocket/shellplate bolt
upside down on the large opening of the socket and tap the bolt with
a piece of wood. It should come out fairly easy.
Q: I can't keep the bearing adjusted, why
doesn't it stay tight?
A: Don't forget to use the shellplate lock bolt on the left side of
the ram to keep the shellplate bolt from turning.
Q: On the RL 550 B the shellplate bolt is not engaging the
set screw on the left side of the press. What's the solution for
locking the shellplate bolt in place?
A: When our bearing kit is added to the 550 the shellplate
bolt is raised about 1/8". On some presses this is enough to prevent
the set screw from locking the shellplate bolt. The solution is our
extra length shellplate bolt, available for sale on our
home page.
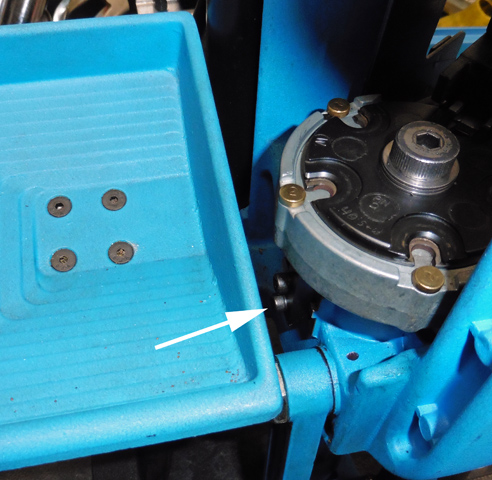
Watch this short video to help you determine if your 550 needs our
Extra Length Shellplate Bolt.
The first picture shows the standard bolt extends about half way
through the set screw opening. The second picture shows our extra
length shellplate bolt completely through the opening. (Double click
pictures to enlarge)


This picture shows the dimensions of the set screw location in the
example pictures above. This will help you determine if you need the
extra length shellplate bolt.
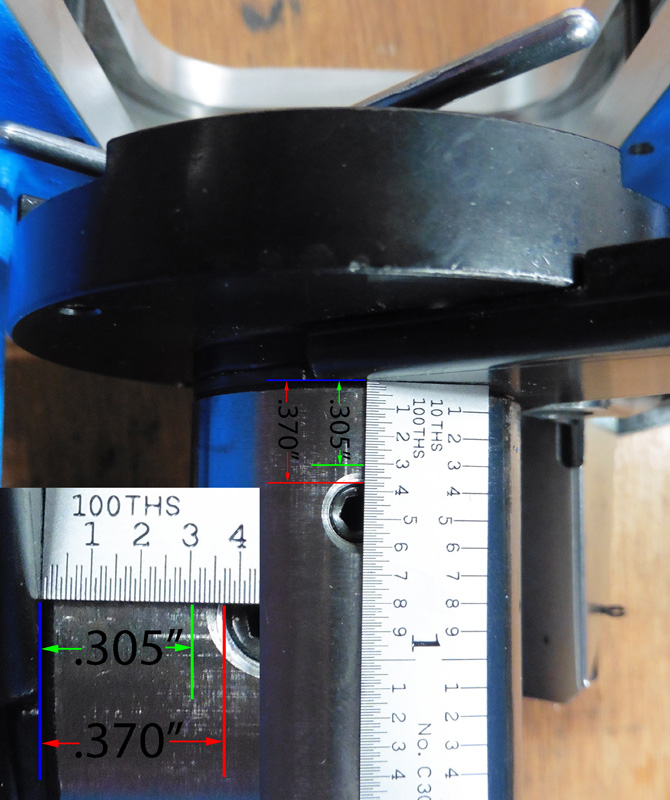
Use a machinist rule or other flexible rule to take these
measurements, its really hard to use calipers for this measurement. If the set
screw is .305" or less from top of the ram you probably don't need the extra
length shellplate bolt. At .370" or greater from the top of the ram,
the set screw will just catch the edge of the standard length bolt
or miss it, the extra length shellplate bolt will fix this
condition.
If the tip of the set screw is damaged, dress the tip with a fine
file or emery cloth.
750 / 650 Series
Q: I can't keep the bearing adjusted, why doesn't it stay tight?
A: Don't forget to use the shellplate lock bolt on the left side of the ram to keep the shellplate bolt from turning.
Q: Is the camming pin the same on the 750 and 650?
A: Yes, it's same part number for both presses.
Q: Is the camming pin the same on the XL750 and SL900?
A: No, the SL900 use a shorter camming pin.
Q: Does the reduced power spring and low mass detent ball work with the 750?.
A: Yes, Dillon provides the same detent ball and spring in the 650 and 750.
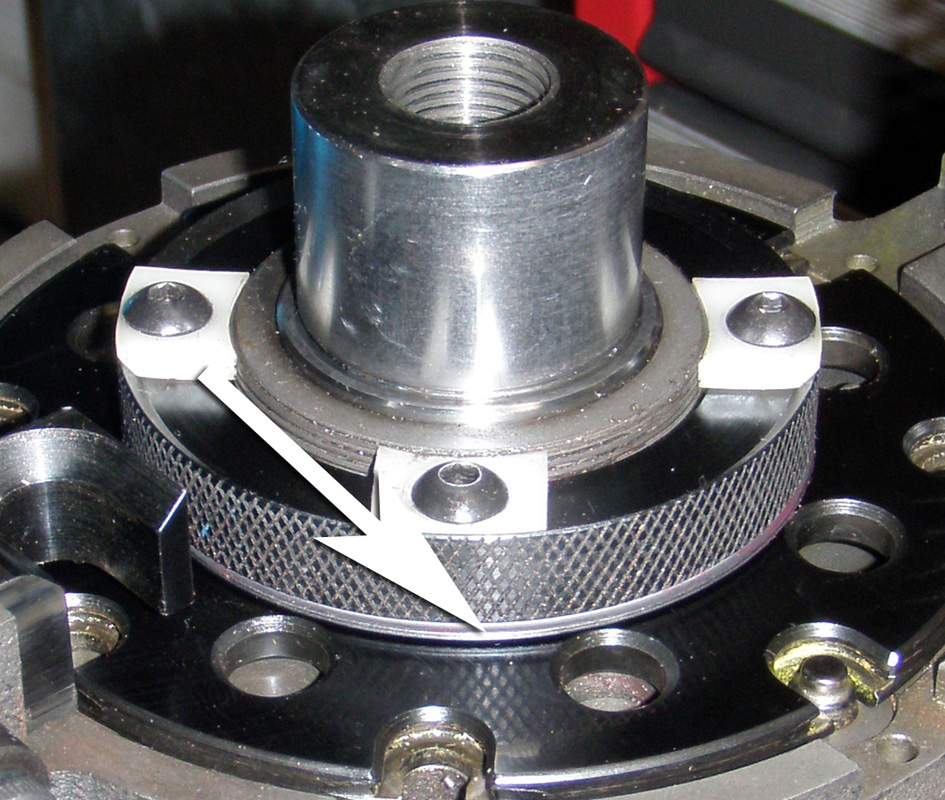
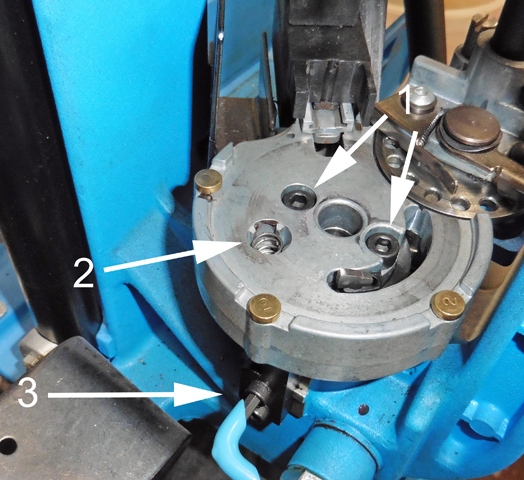
Q: How do I adjust the indexing of my 650?
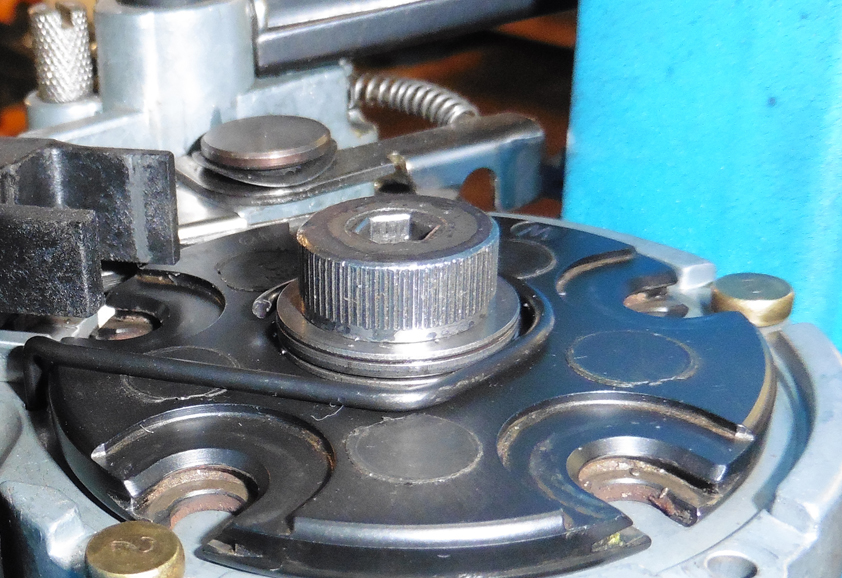
A: The indexing of your 650 should be checked prior to installing any of our products.
If you have a bullet tray, it needs to be removed.
Remove the shellplate.
Check the tightness of the 2 platform bolts (1).
If the bolts are loose, the platform may be out of alignment call Dillon for help 800-762-3845.
Dillon will send you an alignment tool and instructions.
Remove the detent ball (2), it may interfere with the adjustment.
Indexer Block (3), don't adjust quite yet.
Install the shellplate and shellplate bearing.
Adjust the shellplate bearing to establish bearing preload.
Cycle the press a few times.
Continue cycling the press, and watch where the shellplate stops. Looking at the primer seating station, is it centered? Are cases feeding smoothly into the shellplate?
To adjust the indexer block, loosen the 2 screws. Slide the indexer block forward or backwards as necessary. Tighten the indexer block screws and cycle the press several times, adjust as needed.
When satisfied with the adjustment:
Remove the Shellplate.
Install the detent ball.
Install the shellplate and bearing kit.
Install the bullet tray as needed.
Q: Sometimes the case gets bound up on the Hit Factor
diecast ejector, whats the fix?
A: Here are a few things to try.
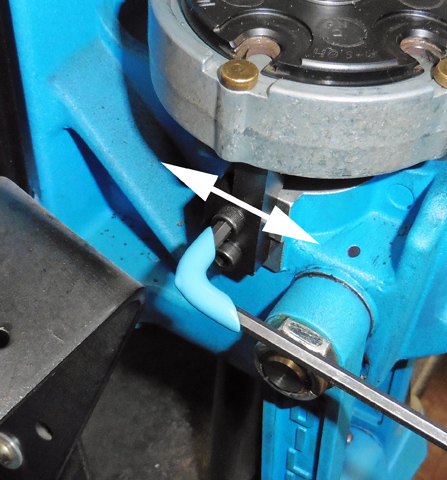
Ensure the lock screw on the left side
of the ram is tight.
Use case lube, even with pistol
calibers and carbide dies.
Keep up the speed, momentum helps with
ejection.
Try some fine sand paper/polish on the
edge of the ejector that contacts the casing.
Tumble the brass a little longer,
eventually the corners of the rim will soften.
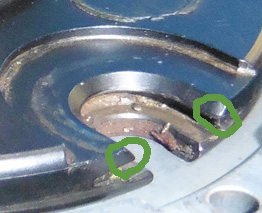
Relieve top edge of shellplate,
circled areas.
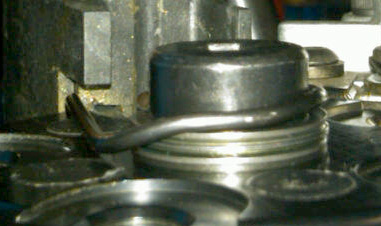
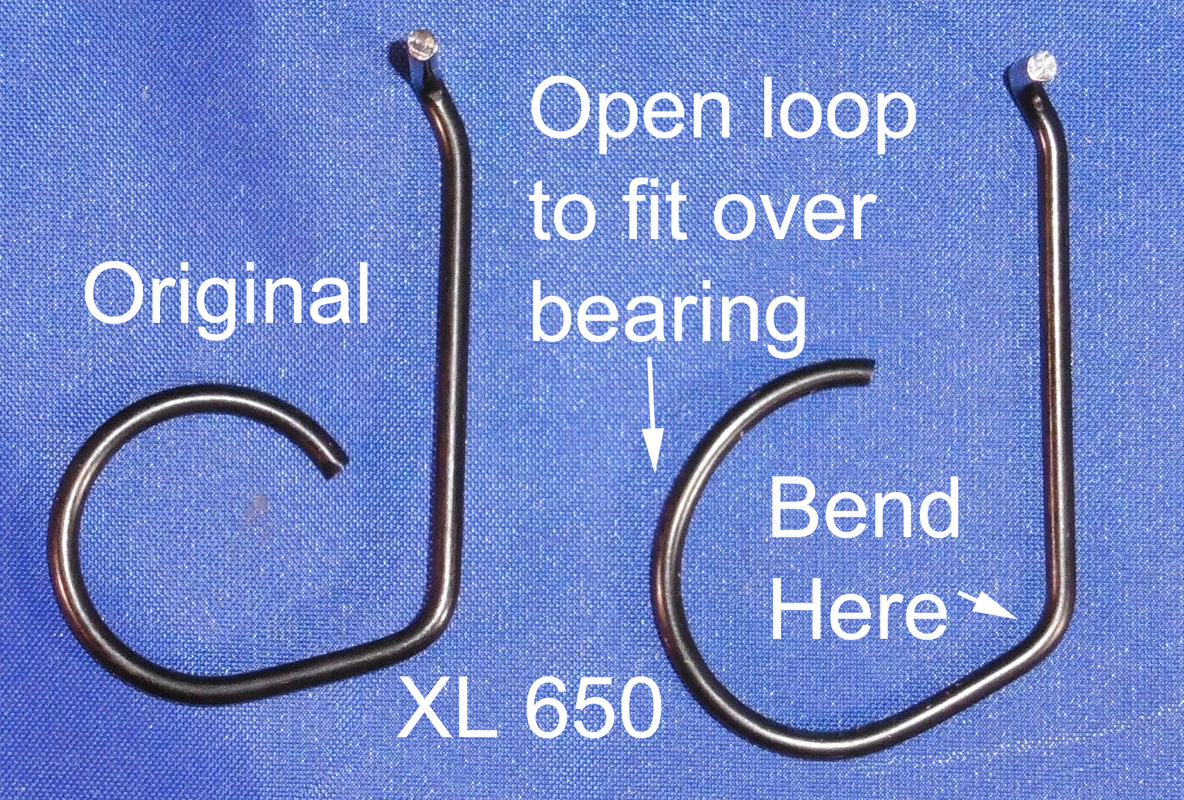
Q: Sometimes the case gets bound up on the ejector wire, whats the fix?
A: Our cast Ejector solves the problem, or try bending the ejection wire to look like these examples.
Use 2 pair of pliers and bend a small amount in several locations.
This will take a couple minutes to bend a bit, test fit and bend a
little more. Don't over think this. If you have to snap it into
position around the bearing, it probably won't stay in place. The
goal is lowering the wire and keeping it in place while reloading.
Here is a short video showing one way to tune the ejector wire.
Method 1
Uncurl the big end
about 1/8", This will make the wire longer so it will still reach
the hole on the platform. About 5/8” from the big end bend it down
and that should clear the bearing stack. Then after an 1/8” bend it
horizontal, the goal is to have the wire hit the case as low as
possible. This technique is recommended for XL 650 presses.
Method 2
Another technique is expanding the large loop so that it fits around
the bearing. Open the angle a little to make the wire longer. This technique is recommended for
XL 650 and SL 900 presses.
Method 1 picture (shown on XL 650)
Method 2 picture (shown on XL 650) - this is the method we show in
the video.
1050 or 1100 Series
Q: On the Super 1050 there isn't enough clearance, can that be remedied?
A: There isn't much clearance to begin with here. Just a few Super 1050 owners have reported this problem. The solution has been thinning the 4 nylon lock tabs on the press by sanding them down with 180 grit sandpaper.
Make sure all 4 screws are snug, then check for clearance again.
Remove tabs and measure thikness.
Sand the top of tab, take off .002" and then test fit. Repeat if necessary.
Another option is sending us your lock ring. We will machine the bottom and mail it back to you. We will remove .080" from the lock ring. The modified lock ring will work fine with or without the bearing installed, so no worries there. eMail us at info@hitfactor.biz and request a quote for machining service.
Q: On the older RL1050 there isn't enough clearance, what should I do?.
A: Send your lock ring to us to machine. We will remove the thickness of the bearing from the bottom of the lock ring. eMail us at info@hitfactor.biz and request a quote for machining service.